Featuring Capital Account, Capital Call, Distribution Wizard Changes
FundPanel Feature October 2025
Commitment Start and End Dates
This functionality allows us to enable and disable fund access, track closes, and enable future enhancements for Transfers. This functionality provides the ability to filter commitments from Fund Activity after the end date has passed.
Start Date - date field on Capital Commitment
Date when a Commitment starts
End Date - date field on Capital Commitment
Date when a Commitment ends


Functionality
Commitment Updates
When creating a new Commitment via New Capital Commitment, Start Date is now marked as required within the wizard
This ensures new commitments going forward will have a Start Date

A validation rule is also in place to prevent an End Date that is before a Start Date. If an End Date is entered incorrectly, it will prevent the record from being saved


Capital Call Wizard Updates
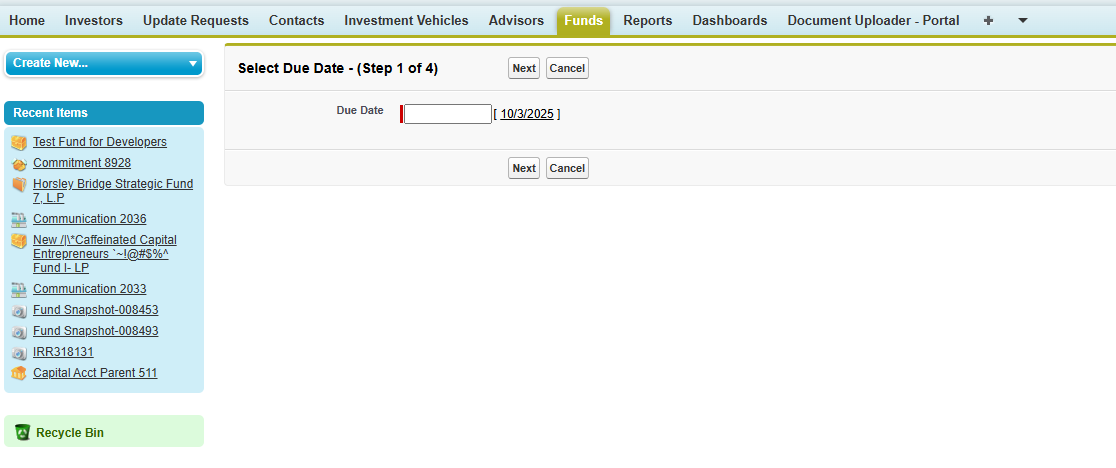
Wizard processing: there is a slight change to how the Capital Call wizard functions. Step 1 will be to select a Due Date. Then, you can proceed with selecting Commitments
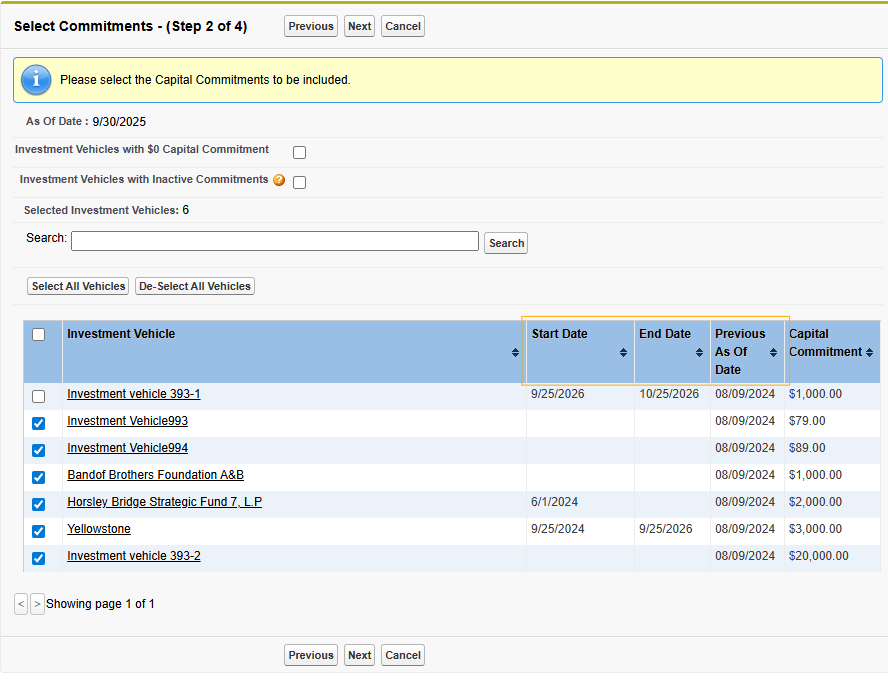
Commitment Start and End Dates are now visible on the Capital Call wizard Step 2, where Commitments are Selected
There are a couple of new changes with this step. First, you will notice the “Investment Vehicles with Inactive Commitments” filter
Inactive Commitments are ones that have a Start Date after the Capital Call Due Date, or an End Date that is before the Capital Call Due date

You can filter for these Inactive Commitments, and still select these Commitments to include them in the Call if needed
You will notice that by default, Inactive Commitments (with Start Date after the Call Due Date or an End Date before the Call Due Date) are deselected, similar to the $0 commitment functionality
Step 3 allows you to still fill out your Capital Call details. You will notice the Due Date is display only, as it was selected in Step 1
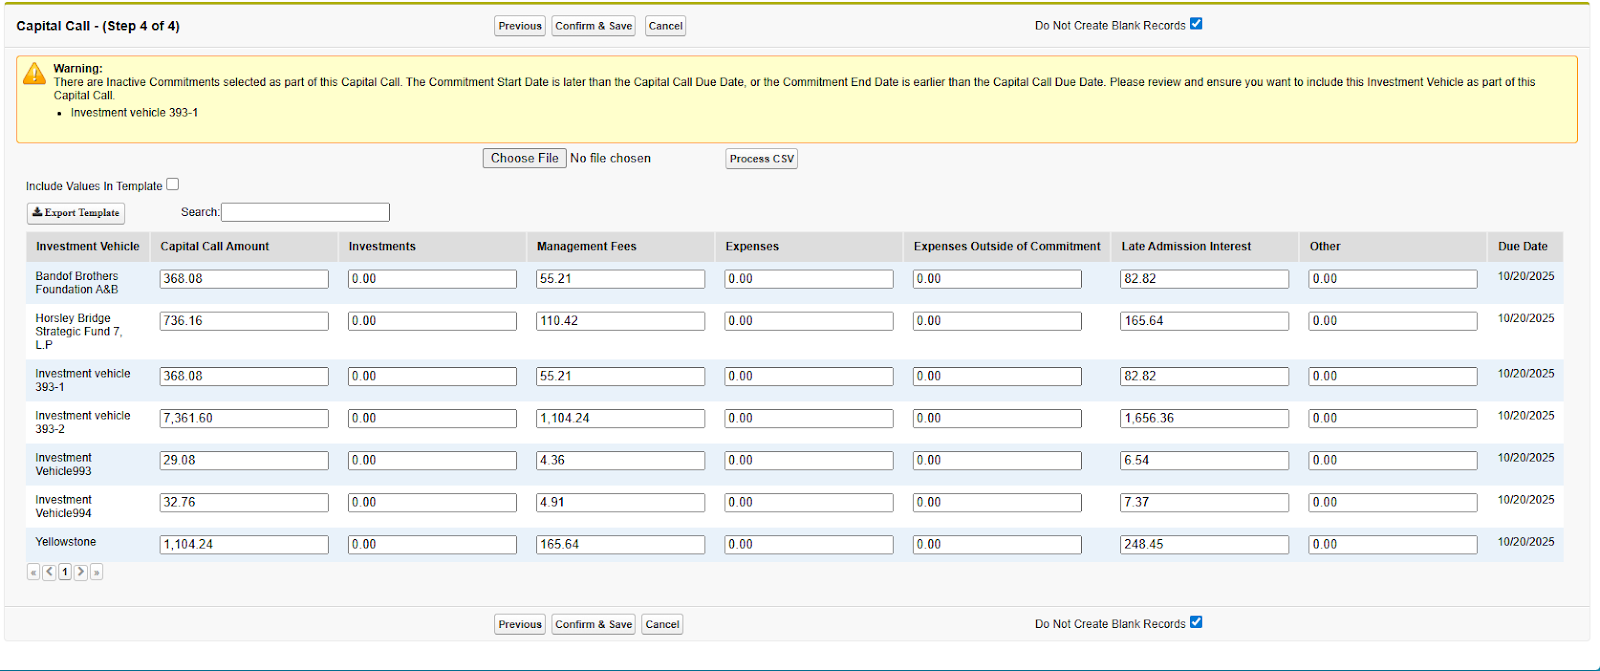
Step 4 remains the same, allowing you to edit individual Commitment Call details
One difference: If you have included an Inactive Commitment as part of your call, there will be a warning shown. You can still proceed with the Call, this is just a warning to ensure you meant to include the Inactive Commitment


These enhancements to the Capital Call wizard also logically separate the steps in the process, clearly outlining where you are in the Capital Call process and how long you have to go. Functionality allows you to navigate to the Next Screen, Previous Screen, or Cancel the current operation.
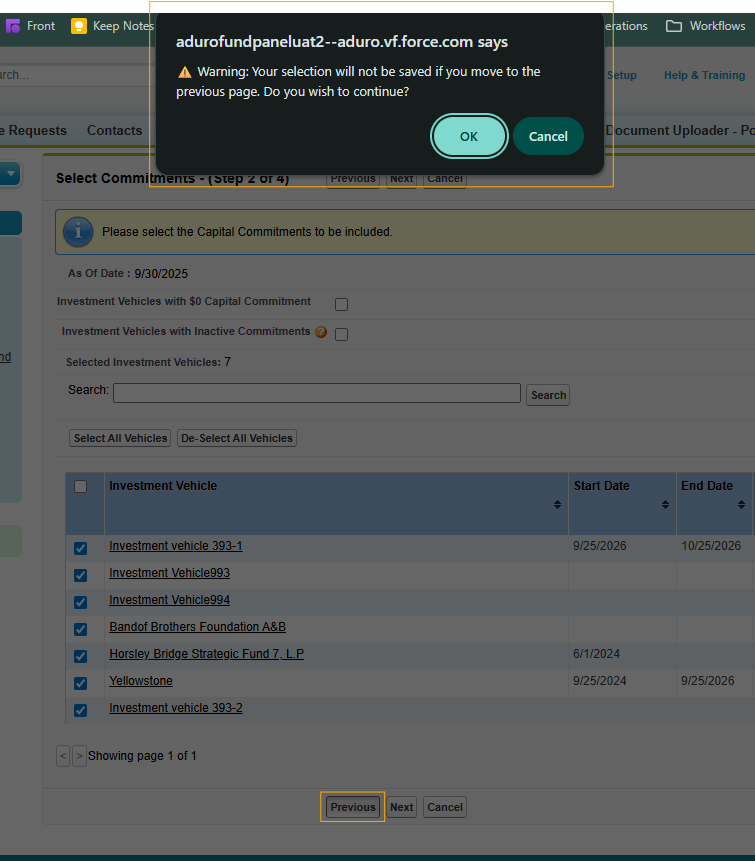
One other important update: In Step 2, if you make Commitment selections, then click the Previous button to return to Step 1 and the Due Date selection, your Commitment selections will not be preserved. A warning will display.

Capital Account Updates
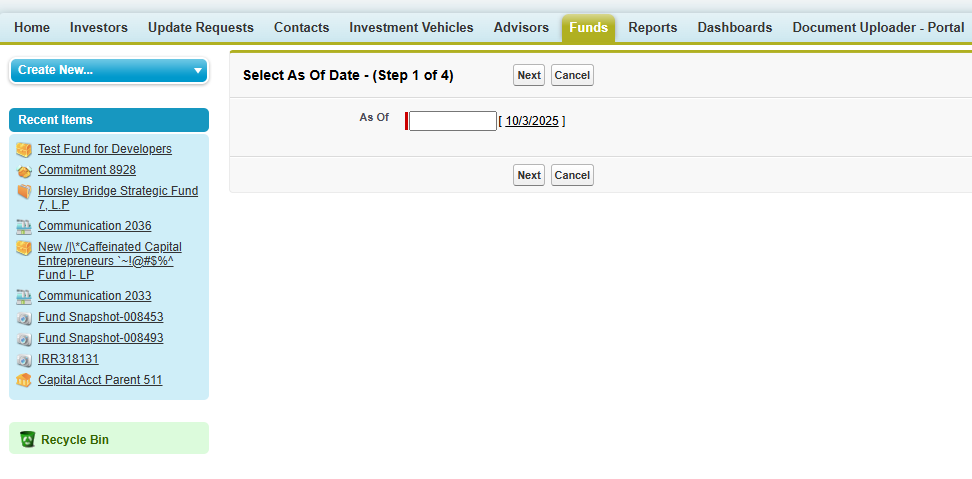
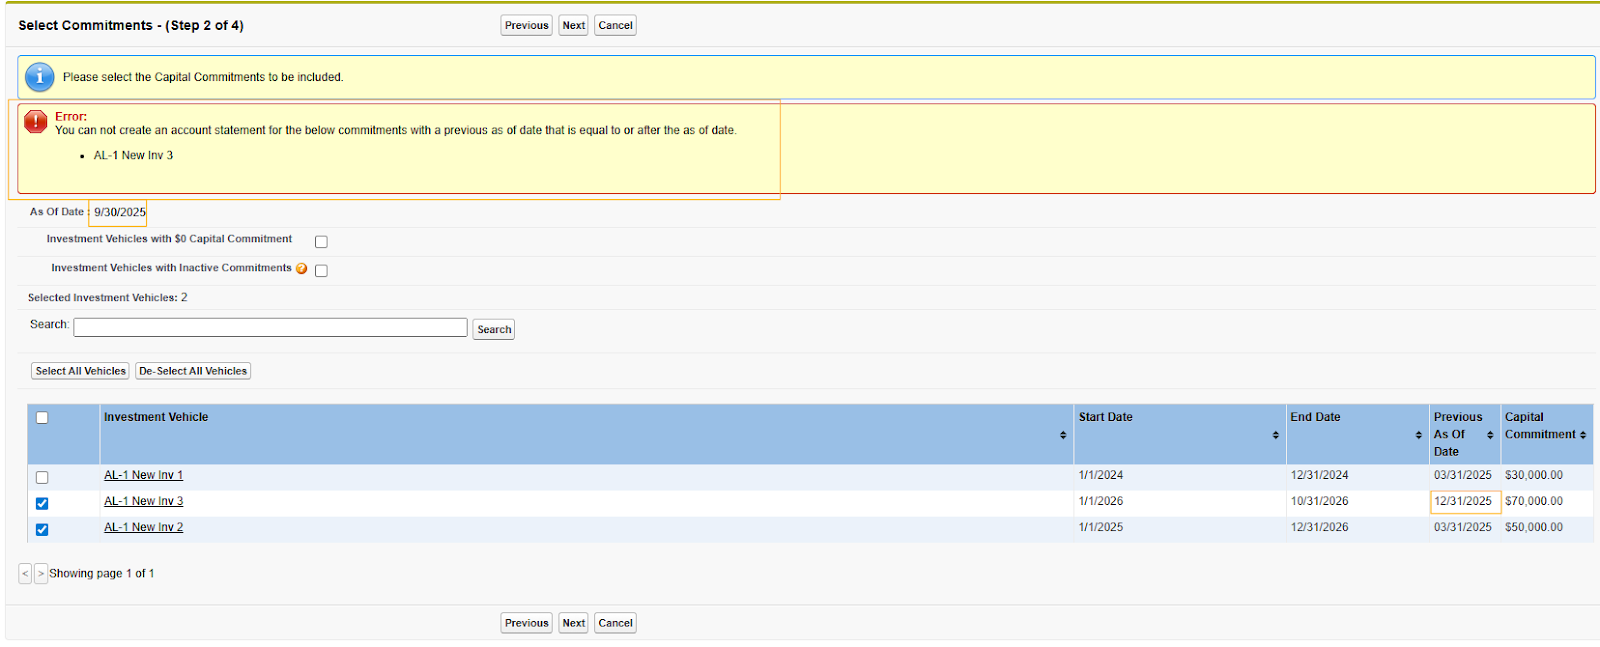
Wizard processing: there is a slight change to how the Capital Account wizard functions. Step 1 will be to select an As Of date. Then, you can proceed with selecting Commitments
Commitment Start and End Dates are now visible on the Capital Account wizard Step 2, where Commitments are Selected. Additionally, the Previous As Of Date for Commitment can be seen
There are a couple of new changes with this step. First, you will notice the “Investment Vehicles with Inactive Commitments” filter
Inactive Commitments are ones that have a Start Date after the Capital Account As Of date, or an End Date that is before the Previous As Of date
You can filter for these Inactive Commitments, and still select these Commitments to include them in the Cap Account if needed
You will notice that by default, Inactive Commitments (with Start Date after the As Of Date or an End Date before the Previous As Of Date) are deselected, similar to the $0 commitment functionality
Previous As Of functionality:
The Previous As Of Date will take the most recent Capital Account’s As Of Date for that Commitment. If there are no Capital Accounts, it will look at the Commitment Start Date for this field. If no Start Date exists, it will then look at Capital Calls or Distributions for the Commitment, determine the earliest date, and use that subtracted by 1 day. If none of the above exist, then the Commitment Created Date will be used
If a selected Commitment has a Previous As Of Date >= the selected As Of Date for the current Capital Account being created, an error will be thrown and you cannot proceed in the Capital Account process
Step 3 allows you to still fill out your Capital Account details. You will notice the As Of Date is display only, as it was selected in Step 1
Step 4 remains the same, allowing you to edit individual Commitment Call details
One difference: If you have included an Inactive Commitment as part of your cap account, there will be a warning shown. You can still proceed with the Cap Account, this is just a warning to ensure you meant to include the Inactive Commitment


These enhancements to the Capital Account wizard also logically separate the steps in the process, clearly outlining where you are in the Capital Account process and how long you have to go. Functionality allows you to navigate to the Next Screen, Previous Screen, or Cancel the current operation.
One other important update: In Step 2, if you make Commitment selections, then click the Previous button to return to Step 1 and the As Of Date selection, your Commitment selections will not be preserved. A warning will display.
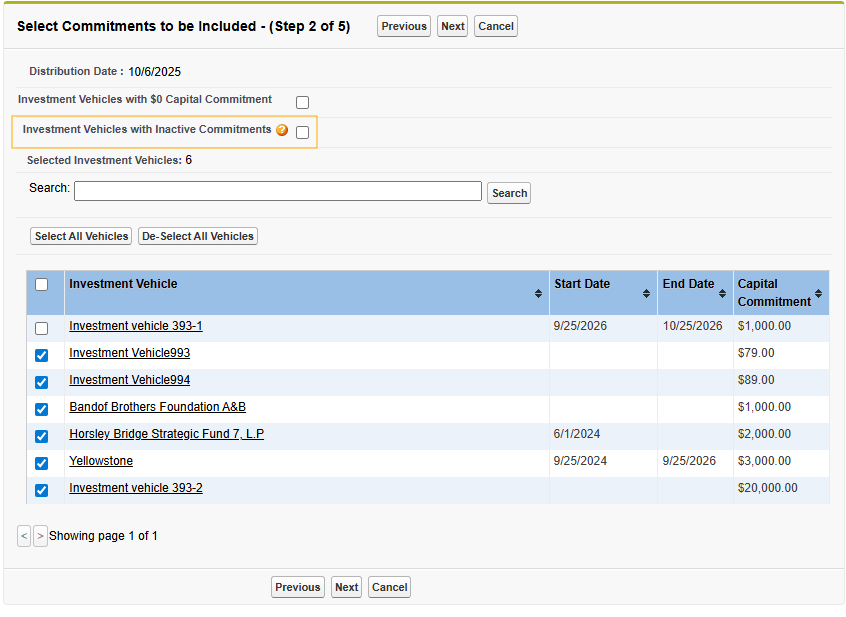
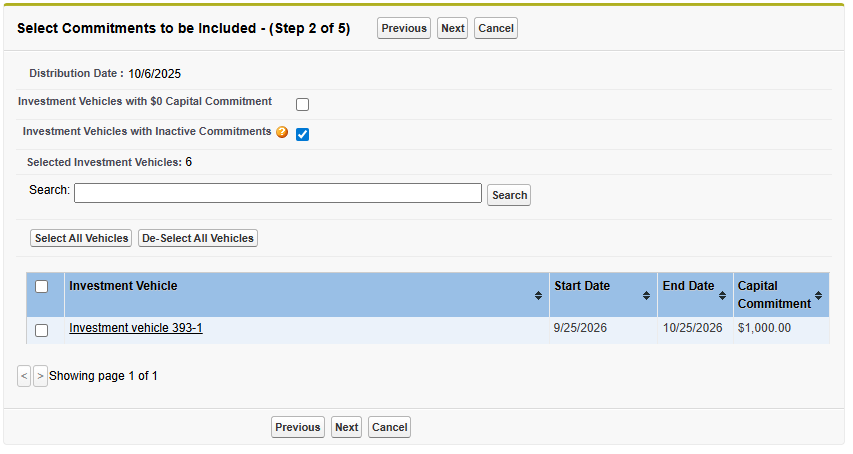
Distribution Wizard Updates
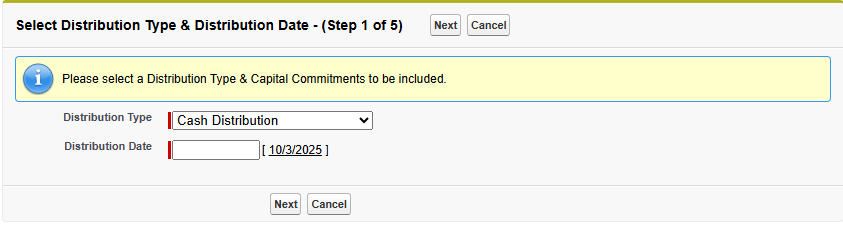
Wizard processing: there is a slight change to how the Distribution wizard functions. Step 1 will be to select a Distribution Type, then Distribution Date. Then, you can proceed with selecting Commitments
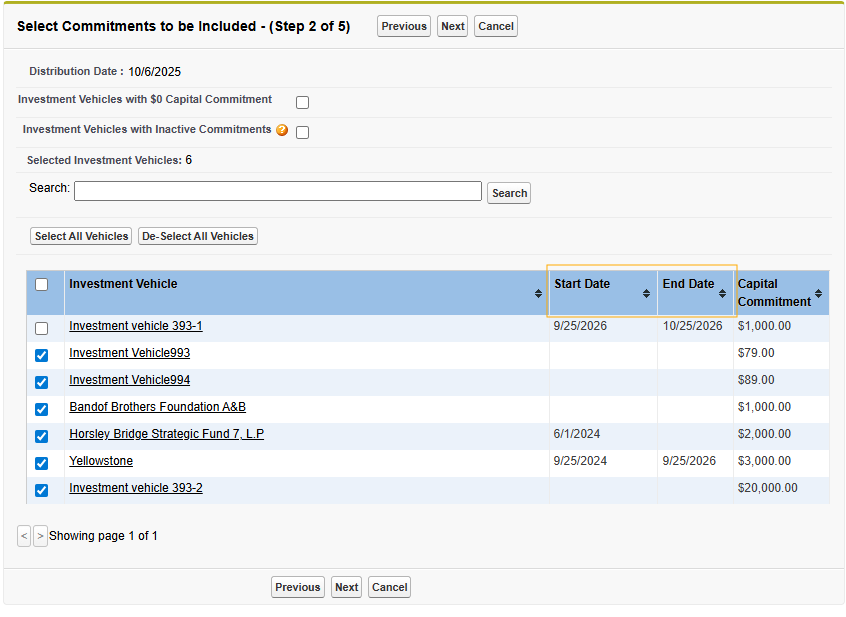
Commitment Start and End Dates are now visible on the Distribution wizard Step 2, where Commitments are Selected
There are a couple of new changes with this step. First, you will notice the “Investment Vehicles with Inactive Commitments” filter
Inactive Commitments are ones that have a Start Date after the Distribution Due Date, or an End Date that is before the Distribution Due date
You can filter for these Inactive Commitments, and still select these Commitments to include them in the Distribution if needed
You will notice that by default, Inactive Commitments (with Start Date after the Distribution Date or an End Date before the Distribution Date) are deselected, similar to the $0 commitment functionality
Step 3 allows you to still fill out your Distribution details. You will notice the Distribution Date is display only, as it was selected in Step 1
Step 4 remains the same, allowing you to edit individual Commitment Distribution details
One difference: If you have included an Inactive Commitment as part of your distribution, there will be a warning shown. You can still proceed with the Distribution, this is just a warning to ensure you meant to include the Inactive Commitment


These enhancements to the Distribution wizard also logically separate the steps in the process, clearly outlining where you are in the Distribution process and how long you have to go. Functionality allows you to navigate to the Next Screen, Previous Screen, or Cancel the current operation.
One other important update: In Step 2, if you make Commitment selections, then click the Previous button to return to Step 1 and the Distribution Date selection, your Commitment selections will not be preserved. A warning will display.
