Welcome to the Email to Salesforce user guide! This guide will walk you through how to set up your unique Email to Salesforce Address. You can then configure your email client (Outlook or Gmail) to automatically forward/redirect emails to your unique Email to Salesforce Address. When you forward/redirect emails to your unique Email to Salesforce Address, the emails will be automatically added to the activity history of the related records in Salesforce.
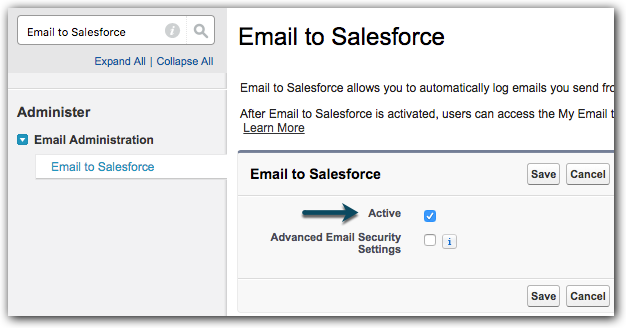
Email to Salesforce
Email to Salesforce allows you to automatically log emails you send from third-party email accounts as activities on lead, contact and related opportunity and account records in Salesforce.com.
Activate Email to Salesforce
Please note: Your Salesforce administrator only needs to activate Email to Salesforce once. Once activated, all users of the Org will be able to leverage Email to Salesforce.
User Permission needed: Modify All Data
From Setup, enter Email to Salesforce in Quick Find box then select Email to Salesforce.
Click Edit.
Select Active.
Click Save.
Advanced Email Security Settings: only enable if you need to configure Email to Salesforce to verify the legitimacy of the sending server before processing a message.
Configure your Email to Salesforce
Please note: Each user of the Salesforce org will need to configure their Email to Salesforce settings.
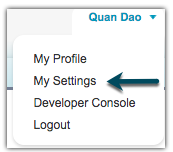
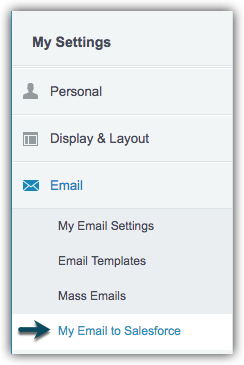
Navigate to your personal settings in Salesforce.
-
Click My Email to Salesforce.
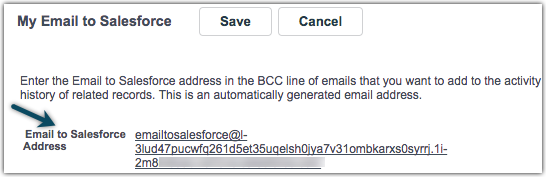
Copy the given link under the My Email to Salesforce section. This Email to Salesforce email address is generated by Salesforce and is unique to your Salesforce user account. You will need this email address later when setting up your third-party email account forwarding/redirecting.
Enter your company email address that you use in your third-party email account to email leads and contacts, separated by commas in the My Acceptable Email Addresses box. Additionally, enter forwarding-noreply@google.com in the My Acceptable Email Addresses box if you are using Gmail (ignore this step if you are using Outlook). Only emails sent from the email addresses you specify can be added to the activity history of related records.
Please Note: The purpose of adding forwarding-noreply@google.com to the My Acceptable Email Addresses is to be able to verify your Gmail forwarding address that we will set up later in Gmail. You will reference this forwarding address in your Gmail email forwarding rule. You can remove forwarding-noreply@google.com from your list once you have completed setting up your Gmail email forwarding rule.

Please note: The settings within this section instructs Salesforce on what to do when emails are sent to your unique Email to Salesforce Address generated above.
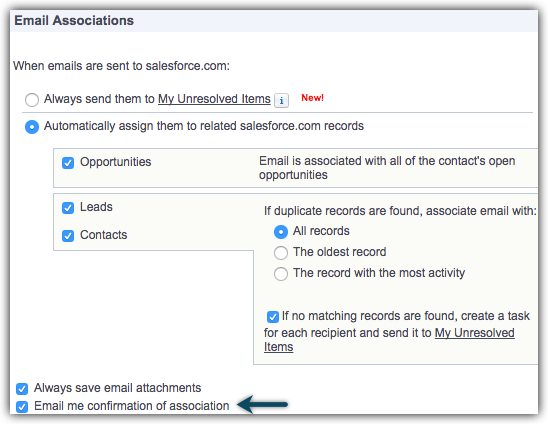
Within the Email Associations section:
Select Automatically assign them to related salesforce.com records.
Select Opportunities.
Select Leads.
Select Contacts. Choose All records. Select If no matching records are found, create a task for each recipient and send it to My Unresolved Items.
Select Always save email attachments. This feature will allow users to log attachments from emails into Salesforce.
Select Email me confirmation of association. We will need this feature enabled to set up Email to Salesforce for our third-party email account. This box can be unchecked at the end of your Email to Salesforce setup.
Emails addresses that are forwarded/redirected to your Salesforce Org will be related to Leads, Contacts, Opportunities, and Accounts object.
You have completed the steps to activate Email to Salesforce for your Salesforce org and configure Email to Salesforce for your user settings!