This article covers using the 'Create Fund Communication' button found on the Fund page. This is a more generalized communication type that does not generate custom PDFs for each Investment Vehicle.
Note: A common use-case for this type of communication is to notify investors about K-1 availability on the Investor portal.
Creating the Communication
- The first step in creating the fund communication is to navigate to the Fund record and clicking the 'Create Fund Communication' button, as shown below:

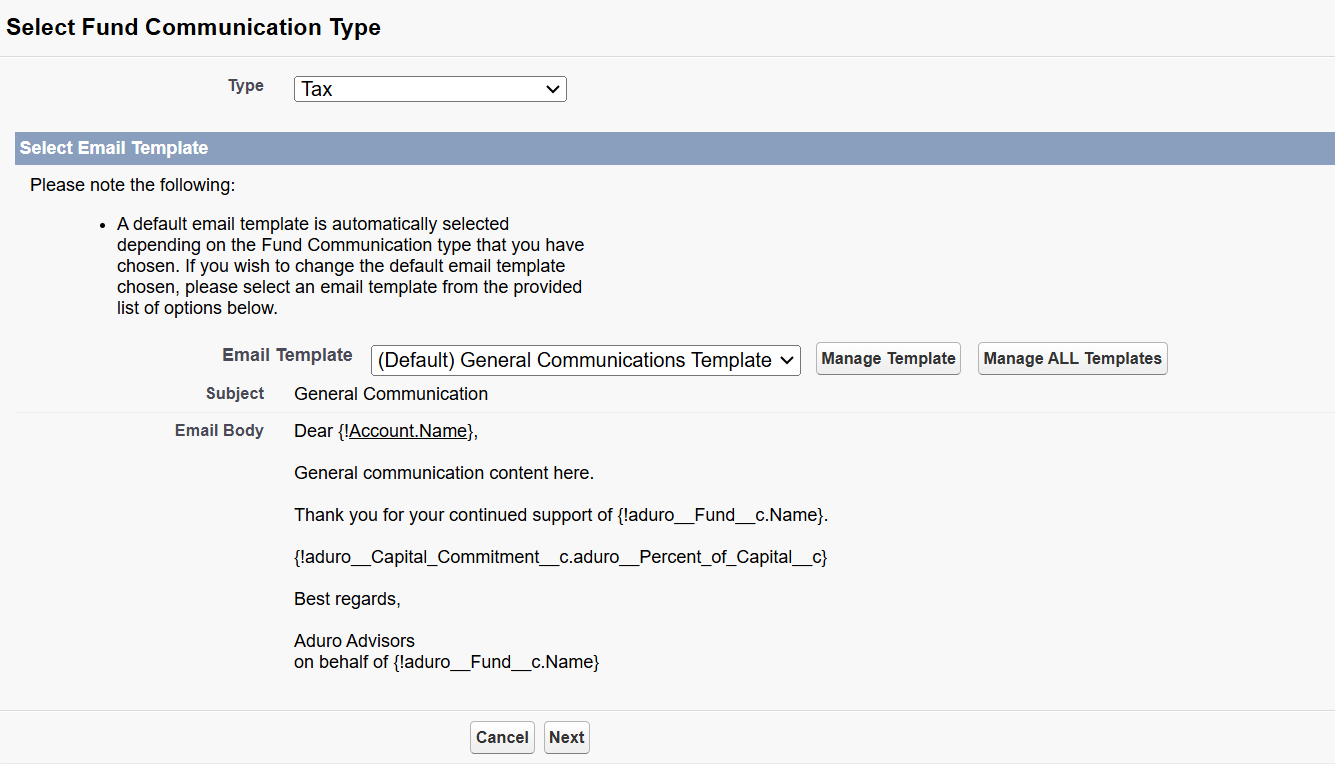
- Next, you will be prompted with a drop-down where you can select the appropriate communication type (General, Tax, etc) from the list. This selection ensures that the communication is sent to any contacts associated with this Fund via the corresponding contact role.
- A default email template is automatically selected based off the Fund Communication type you selected, but if needed you may also select a different email template here if one exists.
- Once you have selected the correct communication type and template, click "Next".
Example: If you wanted to send a notice to the contacts regarding K-1s, you would likely select the 'Tax' role. However, it is recommended that you review all contact roles in Salesforce to ensure that communications will be transmitted to the correct recipients.

- In the "Review Investment Vehicles" view, you may review the list of investment vehicles to include in the Fund Communication.
- Once satisfied with the list, press "Next"

- Last screen will be the "Review Recipients" view which will allow for granular control over individual contacts related to the investment vehicles that were previously selected.
- You may filter the list of recipients by contact role here to include "Any" role or by specific roles. For Example, choosing "Financial" will include any contact who has the role "Financial" assigned to them. Similarly, you may also choose specific roles to exclude. You can confirm selections by referring to the "Applied Filters" section.
- With all filters applied, you can then review the final recipients list based off all selections we've made in the list at the bottom of the page.
- Click "Create Fund Communication" at the bottom of the page once you've confirmed the list of recipients.

Communication Record Overview

1. These fields on the left are useful for editing prior to sending the communication. The Subject, CC and BCC fields function the same as they would on an email client. To make changes to these fields, press 'Edit', make the needed changes, then press 'Save'.
2. In this button area, you will use the 'Edit Email Content' button to adjust the body of the email prior to being sent. Once you are ready to send your communication, use the 'Send Emails By Investment Vehicle' button.
3. Once your email has been sent, you will see these fields updated to reflect the date, denote the email has been sent, and show any errors that may have occurred during the sending process. If there is an error message shown in the 'Status', or if a message stays in 'Not sent' even after being sent, please reach out to to the support team for further assistance.
Reviewing the Recipients
- Before sending communications, it is recommended as a best practice to review the recipients to ensure that the correct recipients have been selected. To view the recipients, scroll down on the Fund page.
- It is important to note that Salesforce only displays a select number of recipients on this page. Press 'Go to List' at the bottom of the recipients list to see all the recipients for this communication.
- From here you may also Download All recipients as well as Send a Test Communication to yourself to review how the body and/or PDF views in email format. You will be prompted to select a recipient to use to populate the custom merge fields.
Recipients List

Sending the Communication
- Once your communication is ready to be sent you will have two methods of sending:
- Send by Investment Vehicles will group and send contacts of each Investment Vehicle into one email per Investment Vehicle.
- Send Emails by Contact button will send one email per contact without grouping, with each contact receiving their own email.
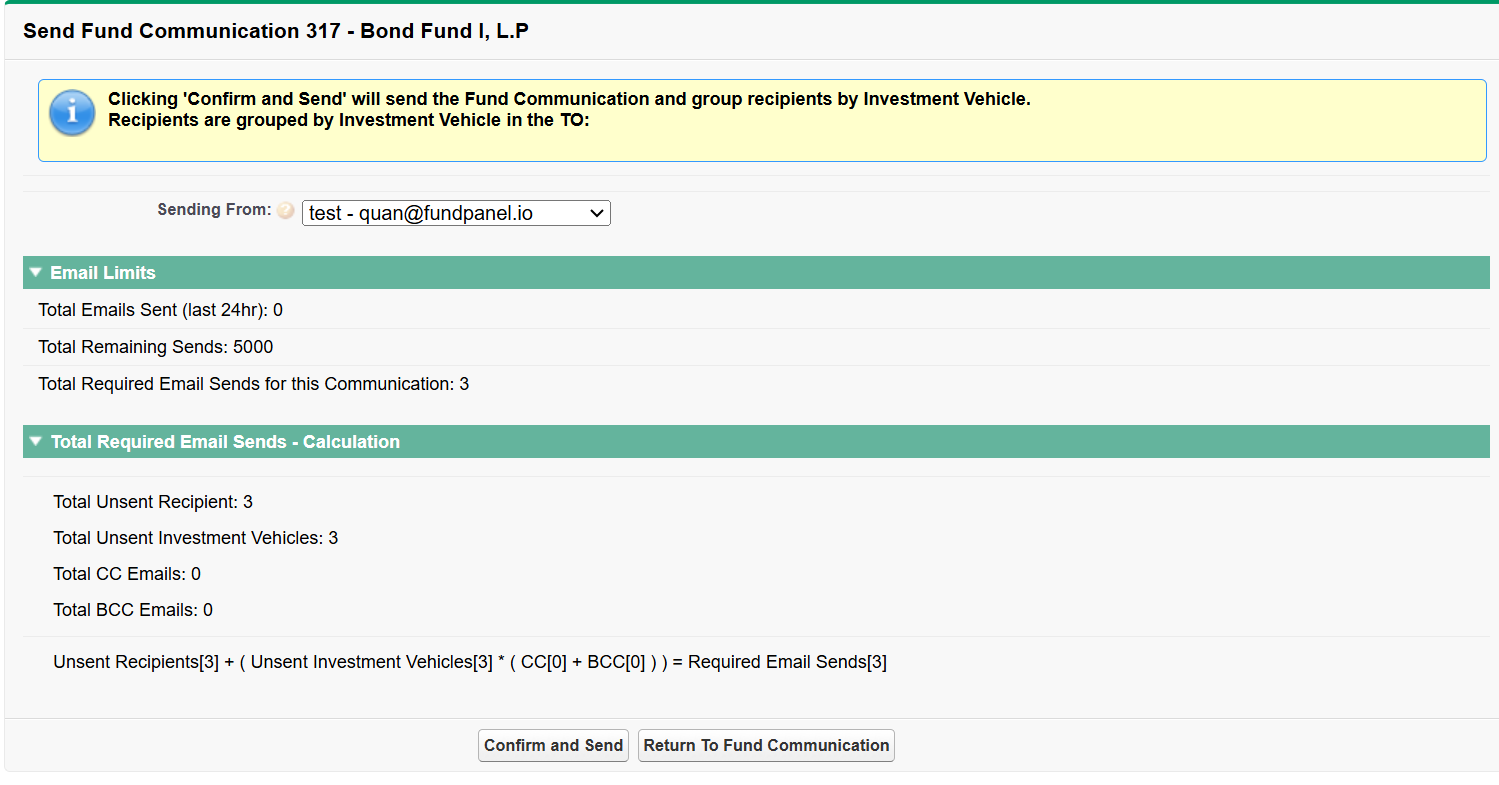
- Once one of these buttons this is pressed, you will be navigated to the following screen:

- If you have multiple email aliases setup in your client's org, the 'Sending From' drop-down list will allow you to choose what the 'From' sender name will be once the communication is sent.
- The Email Limits section and Total Required Email Sends section will provide insight into how many emails your org can handle and if you're within comfortable range of sending your communication.
- Press 'Confirm and Send' on this screen to send out the communication. This page will then notify you that the communication is sent.
- Note: On rare occasions, an error may be displayed on this page if the communication is unable to be sent - in these cases, please reach out to support if you are uncertain on how to proceed.
- Now that the communication has been sent, you can return to the communication record to see the 'Sent' communication details. The 'Number of Successes' field value should align with the number of recipients on the communication.
Note: If there are any failures in the 'Number Failed' field, double check that your recipients all have valid email addresses and that you Contact Roles are associated with valid Contacts. If there are no errors in the data and the issue persists, please contact support.